skip to main |
skip to sidebar
 This is another of my favourite recipe from Better Homes and Gardens New Baking Book, page 326, that can easily be made on the spur of the moment. I’ve always wanted to try out this recipe but we could never find dried tart cherries around town, finally one day, we came across a bag of dried tart cherries from Costco, it was jubilation! I’ve made a couple of dozen of these muffins since I found that bag of treasured tart cherries from Costco. Love these cherry muffins!
Ingredients:
2 cups all-purpose flour, ½ cup granulated sugar, 2 tsp. baking powder, ¼ tsp salt, 2 beaten eggs, ½ cup dairy sour cream, 1.2 cup milk, ¼ cup cooking oil, ½ tsp finely shredded lemon peel, ¼ tsp almond extract, 1 cup dried tart cherries, ½ cup chopped almonds, lemon glaze.
Summary:
Mix all dry ingredients and make a well in the centre. Mix together eggs, sour cream, milk, oil, lemon peel and almond extract and then add the mixture into the well and then stir until evenly moist. Fold in dried cherries and almonds and then spoon into muffin cups and bake for 12 to 15 minutes at 400F. Brush with lemon glaze (3/4 cup sifted powdered sugar and 2 tsp. lemon juice and 2 tsp. water.)
Source: Better Homes and Gardens New Baking Book, page 326

 For once I didn’t need to use the Better Homes and Gardens New Baking Book for a baking inspiration. The Artful Cupcake – Baking & Decorating Delicious Indulgences by Marcianne Miller is one of those books that I purchased just for the pretty pictures. It’s a collection of lovely cupcake designs and recipes created by twelve professional bakers and compiled and modified for the home baker by Marcianne Miller, the author. I was looking for a cupcake recipe and design idea that was simple, easy to make but interesting and this one recipe and simple design by Martha Vining on page 26-27 caught my eye. All I had to do was shift some all-purpose flour together with sugar, baking soda, baking powder, salt and cinnamon, unsweetened cocoa powder (the usual suspects) and mix them together before adding the wet ingredients that consist of vegetable oil, vanilla extract, a couple of eggs, cabernet sauvignon wine and then mix all of those ingredients in a stand mixer starting at low speed and then gradually increased to high speed for a few minutes and then fold in some dried cherries, spoon the dough into muffin cups, bake for about 20 minutes or so at 375 F (1) and voila! Here’s one lovely and sophisticated tasting cupcake with whipped cream and cherry on top. Who would’ve thought that cabernet sauvignon could be used as an ingredient for sweet baked goods! All I can say is: Martha Vining, you’re genius!
(1) For a detailed and more accurate recipe see source: The Artful Cupcake – Baking & Decorating Delicious Indulgences by Marcianne Miller, page 26 – 27 – “Chocolate with Cabernet Cupcakes” design and recipe by Martha Vining.

 I finally tried out mom’s recipe for Sweet and Sour Fish but instead of corn flour I used all-purpose flour since it was the only flour I had. The fillet still turned out quite crispy not to mention quite tasty too, although I can’t say the same about the sauce. I must’ve missed a step or something because the sauce, although colorful and healthy, didn’t taste exactly the same as when mom made it. The sauce was a bit too sour and not sweet enough, I must’ve put too much vinegar and not enough sugar.
 Ingredients:
1) Fish Fillets, cut into small/bite pieces
2) Lemon juice from ½ a lemon
3) Worchester Sauce
4) Salt & white pepper
5) Fish Sauce
6) 1 tbsp Chinese cooking wine (Wong Chiu or Sau Sing Chiu)
7) A dash of white vinegar (to make fish crispy)
8) Egg white
9) Mrs. Dash, paprika, black pepper and “Old Bay” Seafood seasoning (optional)
10)Corn Flour (Mazena) or all-purpose flour
Direction:
Heat canola oil in a pan on medium heat. Mix ingredients 1 to 7 together in a bowl and ingredients 9 and 10 together in another bowl. Dip the fish fillets into the first mixture and then dip into the egg white and then cover with flour mixture. Once the oil is hot, put each piece into the oil and fry until golden brown and set aside.
Sweet and Sour sauce
Ingredients:
1) Lemon juice from ½ a lemon
2) Ketchup
3) Tomatoes (optional)
4) Red and green peppers, diced
5) Carrots, diced
6) 1 tsp. Cornstarch dilute in 3 tbsp. water
7) Sugar
8) 1 tsp vinegar
Direction:
Stir fry all ingredients until cooked and pour over the fried fish fillets. Serve.

 I’ve made this easy and healthy lunch/snack twice in the past two weeks, well, because it’s quick and easy, fresh tasting and delectable and best of all, no stove cooking required. Who knew a fish out of a can can taste so good?
Ingredients:
1) 1 can Sockeye salmon
2) ¼ cup dice red onion
3) ¼ cup capers
4) ½ lime juice
5) Fresh dill (optional)
6) Black pepper, Mrs. Dash
7) “Old Bay” seasoning for seafood
8) 1 tbsp. light sour cream
9) Swiss cheese, slice or grated
10)Multi grain bread, lightly toasted
Direction:
Place the canned salmon into a mixing bowl and break the salmon into smaller pieces with a fork. Add the rest of the ingredients (except cheese and toasts), mix together evenly and set aside. Put some grated cheese on the toasts and then place a spoonful of the salmon salad mixture on top. Bake/broil the toasts for 5 minutes or until cheese is melted and then serve.

 I just discovered a way to pan-fry a salmon fillet without burning the skin and without crumpling it in the process. The trick, apparently, is to preheat the oil on high heat and then lower the heat once the oil is hot and then put the salmon in the pan, skin down and leave it to cook for a few minutes before turning it over. Elementary really, but it was a revelation to me (duh!!) I’ve ruined (and burnt) so many salmon fillets in the past when trying to pan fry/sear them in the pan because I either kept the heat on too high for too long or put the fish in the pan too early, before the oil is hot. No more burnt salmon for me from now on! The salmon fillet turned out perfectly this time, the skin was crispy and crunchy and the meat was delicious and nicely spiced. It was slightly greasy but oh, it was goo-ood!
 Ingredients:
1) Salmon fillet
2) Garlic, chopped
3) Shallots, diced
4) Sea salt, black pepper, Mrs. Dash
5) Canola oil
Direction:
Heat canola oil in a (iron) pan over medium high heat and then sprinkle a dash of sea salt, black pepper and “Old Bay”/Mrs. Dash. Season the fillet with sea salt, black pepper and seafood seasoning. Once oil is heated in the pan, lower the heat to medium and place the salmon fillet, skin down, and let it cook for about 5 minutes. Turn the fish over and cook for another 3-5 minutes (or until cooked). Turn the fillet over once if more crispiness is desired and then set aside on a plate. In the same pan, stir shallots and garlic together for a few minutes or until shallots are cooked. Pour over the salmon and serve with salad.

It's that time of year...
 Happy Holidays to everyone and peace on earth!
 The Chocolate Experiment
My better half requested a chocolate cake for his birthday so I delved into my one and only favorite baking book - the Better Homes and Gardens New Baking Book - for a special chocolate cake recipe (preferably one that I haven’t tried before.) I found two recipes that sounded interesting. One is the Double Chocolate-Orange Torte (1) on page 144, and the other one is the Raspberry Truffle Cake (2) on page 146. Hmmm…., decision, decision! Both seemed simple enough to make, and with a little decoration here and there, either one of them had the potential to become a sumptuous birthday cake for that special someone.
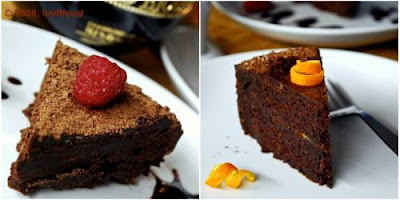 I decided to go with the Double Chocolate-Orange Torte (Better Homes and Gardens New Baking Book – page 144) since it’s a layered cake that has orange marmalade filling in the middle and bittersweet chocolate icing on the outside, elements that make for a perfect birthday cake.
 The recipe calls for an 8x8x2-inch baking pan and suggests a simple decoration of bittersweet chocolate frosting with chocolate curls pressed into icing on all four sides of the cake. Simple enough. But silly me, I decided to get creative and had an entirely different idea in my mind for the cake decoration. I have this pretty book called The Essential Guide to Cake Decorating by Whitecap books that I bought a few years ago that I like to browse through once in a while just to look at all the pretty pictures but never really follow through on any of the decorating ideas inside the book. This time, out of all the time in the world, I decided that I might just try one or two of the simpler ideas presented in the book: striped chocolate curls made of white and dark chocolate, on page 130, to be put on top of the cake and spotted collar (white chocolate dots on dark chocolate collar), on page 136, for around the cake. I also decided that instead of having a square cake, I wanted to experiment with having two-level round cakes, one bigger and the other smaller, with the chocolate spotted collars around the two-level cake and the striped chocolate curls prominently planted on the top level of the cake, wouldn’t that be pretty?
 Things started well enough at the beginning. I followed the recipe exactly but instead of using an 8x8x2-inch baking pan, I switched to a 4-inch springform pan and a 6-inch baking pan for the two-level cake. While waiting for the cakes to bake, I did the preparation for the striped chocolate curls. I was in a good mood and was all excited to start decorating the cake, having a vivid picture of the pretty two-level Double Chocolate-Orange Torte - with the spotted collars and striped chocolate curls - in my mind’s eye.
And then this happened. Oops! Forgot to put a cookie sheet underneath that 4-inch springform and as a result, the dough spilled all over to the bottom of the oven and made this mess! There goes my two-level cake!
 Not to be outdone, the chocolate that I was tempering to make the striped chocolate curls would not set properly, so no chocolate curls for now! This one was entirely my fault though, because I used a non-baking white chocolate, with a “smooth centre”, no less. So the chocolate didn’t set well. Lesson learned. Somehow this chocolate tempering session (3) still managed to produce some chocolate shavings that proved to be useful in the end.
 Being the obsessive compulsive that I am, I just couldn’t make do with the one good cake that I had. I wanted to see my pretty two-level cake vision come to fruition, so I came up with plan B: bake another cake. But instead of baking the same cake twice, why not go with the runner-up this time: Raspberry Truffle Cake – page 146? (I was planning to try out that recipe right after the Double Chocolate-Orange Torte anyways and I already had all the ingredients, including the fresh raspberries and the seedless raspberry jam called for by the recipe!) Perfecto!! So I followed the recipe for the Raspberry Truffle Cake word for word, well, except for the 8-inch springform pan – I used a 7-inch one. I wouldn’t say that this process went smoothly either. I think I somehow overbeat the egg whites. Oh well!!
 Because I didn’t have the right white chocolate and I was stuck with packages of baker’s dark chocolates, I failed to fulfill my vision of that perfect spotted collar made of white chocolate dots on dark chocolate collar. Instead, I finally got to utilize the never-before-used chocolate transfer sheets that I had hidden since I first bought them a year ago. And these chocolate transfer sheets turned out to be fun to use and pretty to look at! All was well in the end!
 The Double Chocolate-Orange Torte was simply divine and the Raspberry Truffle Cake with a mix of raspberry and dark raspberry sauce was simply a chocolate lover’s dream.
 Notes:
(1) Source: Better Homes and Gardens New Baking Book, page 144
Double-Chocolate-Orange Torte
 Ingredients:
For cake: 3 squares of unsweetened chocolate; ¾ cup all-purpose flour; 11/2 tsp baking powder; ½ tsp baking soda; ½ tsp. salt; ½ cup butter; 1 cup sugar; 4 eggs; 2-3 tbsp. orange liqueur; ½ cup water; 1 tbsp. shredded orange peel.
For filling: Cut cake in half horizontally and drizzle each half with liqueur mixture of 1 tbsp. orange liqueur and 1 tbsp orange juice; spread ½ cup orange marmalade on top and top with remaining cake layer.
For Bittersweet chocolate icing: 1/3 cup whipping cream; 1 tbsp. light-colored corn syrup; 6 ounces semisweet chocolate.
(2) Source: Better Homes and Gardens New Baking Book, page 146
Raspberry Truffle Cake
 Ingredients:
For cake: 16 ounces semisweet or bittersweet chocolate, cut up; ½ cup butter; 1 tbsp. sugar; 11/2 tsp. all-purpose flour; 1 tsp. raspberry liqueur (optional); 4 eggs, separated.
For sauce and extra topping: 1 12-ounce jar seedless raspberry jam (I cup); sweetened whipped cream (optional); fresh raspberries (optional).
(3) Chocolate tempering tips from Chocolate Obsession – Confections and treats to Create and Savor by Michael Recchiuti & Fran Gage, page 28 - 29
Pork Feet Stew Pork Feet stew (Cu Kiok) is another old time favorite that my mom cooked during my visit; it’s another dish that I will probably never cook on my own since I’ll never get it right even if I try. It’s one of those dishes that is good to have once in a while, although the pork feet and the pork feet skin are supposed to be good for your joints - according to my mother that is - again, there’s no scientific proof whatsoever of this claim. This is another reason why I love mom’s cooking: there’s often a fascinating story or some kind of outlandish claim behind the delicious food that she prepares – I find it quite entertaining.
Pork feet I can tolerate, in fact, the stew sauce is quite tasty to have with a bowl of rice. Chicken feet on the other hand, that’s something else. The claws scare me. I can’t never ever, enjoy eating chicken feet (I tasted a very small bite one time at a dim sum, but really disliked even the texture of it). Some people love it though and I applaud them (since that means that they’re not scared of the claws). Plus, I heard that those chicken feet (supposedly) are good for your joints and cartilage.
Basic Ingredients:
1) Pork feet and thigh meat
2) Dark soy sauce
3) Garlic
4) Star anise
5) Brown sugar or kecap manis (sweet soy sauce)
6) Salt and pepper
Direction (roughly):
Rinse pork feet and meat with boiled water and set aside. Saute pork feet and meat with garlic until fragrant, add soy sauce and sweet soy sauce or sugar, a dash of salt and white pepper, water and star anise and cook on medium heat until boiled and lower heat and simmer for a few hours until the meat falls off the bones.
Chicken soaked in Chinese Red Rice Wine or to make it sound more fancy: Poulet Au Vin Chinois This Chicken soaked in Chinese red Rice Wine is actually something I’ll probably never cook on my own - no matter how adventurous I may feel in the kitchen. Firstly, this special soup dish needs a special red rice wine that is not available in any store in North America, Chinese or otherwise. My mom usually orders her supplies from a home brewer in Toronto when she’s in town because not everyone knows how to make this special red rice wine well; if you get the wrong make of wine, the soup just won’t taste how it’s supposed to taste: semi-sweet and spiced up. Secondly, this is not exactly a regular dish that one would have everyday, except for a woman who has just given birth to a baby or a woman who has just had her period. This soup (supposedly) has the properties to reinvigorate the after-giving-birth body and to stimulate new “qi” in the body to help strengthen a weakened body. A woman who just had a baby would usually eat several dishes of this per day, everyday, for forty straight days (which could add up to forty whole chickens for forty days, imagine that!!), and according to the (Hakka) Chinese old wives’ tales, a woman who’s just given birth should stay confined within the house for forty days and should not wash her hair for forty days (in the old days, anyways); the old wives’ logic being that a woman’s body who has just given birth has a weakened immune system and it takes about forty days to recuperate. The same (supposedly) “health” benefits of this dish also applies to a woman who has just finished her monthly cycle, except she doesn’t have to eat the dish for forty days obviously, just a couple of servings for a few days, enough to keep the next monthly cycle regular and on time.
 I still look forward to having this soup on the rare occasions that my mom cooks it. It’s still a tasty dish even though it (supposedly) has some remedial properties. The combination of ginger and sesame oil produces a nice smoky fragrant that complements the dulcet and mulled flavor of the red rice wine. The chicken, soaked up in wine, is tender and succulent and the boiled eggs make the soup even more enjoyable. A sip of this Chicken soaked in Chinese red rice wine soup gives a jolt of energy to my body and a warm rush through my veins. The ginger is supposed to get rid of chill/wind/cold in the body and the red rice wine is supposed to clean the blood and stimulate new red blood cells, or something like that.
There’s certainly no scientific proof of any of these, after all, this is just a (Hakka) Chinese old wives tale that’s been passed down from the older generations to the new generation and then to me, and so I’m only repeating what I heard, therefore I take it with a grain of salt ☺ Well, there’s my little contribution of an old wives tale to the mother of all old wives tales.
 Red Fermented Rice is used to make the Chinese Red Rice Wine
Ingredients:
1) Dry ginger – diced unpeeled ginger, sauté in pan on low heat without oil, until dry but not burnt.
2) Red Rice Wine
3) Free range chicken
4) Sesame Oil
5) Chinese herbs (optional) - Hong Zao; Dang Shen; Bei qi (consultation with professional Chinese herbalist required before consuming any of these Chinese herbs)
6) Boiled eggs
Direction:
1) Saute dry ginger with sesame oil.
2) Add chicken and sauté.
3) Pour red rice wine and herbs and cover.
4) Cook on medium low heat for 45 minutes to 1 hour, until chicken is tender.
5) Add Boiled eggs
Mie Ayam mama dan Pangsit ala mama (Mom’s Chicken Noodle and Dumplings) I had a family get together in Toronto a few weeks ago and I got to taste mom’s cooking again. One of the things she cooked was my all time favorite comfort food, namely mom’s chicken noodle and dumplings. I try to follow mom’s recipe as close as I can when I cook my own Mie Ayam ala luv0food and Pork and Prawns Dumplings, but as soon as I tasted mom’s version, I could tell even from the first bite that hers was somehow… better - the flavor had that certain zing to it that mine doesn’t have. My version is not that bad though, but just not as good as hers is all. It didn’t take much prodding for her to spill the beans, in fact, she is always too happy to share all of her recipes with anyone who cares to ask. I wrote down every detail this time and I am going to try out her exact version of Mie Ayam and pangsit, soon I hope, but meanwhile I have these pictures that I took of mom’s Mie Ayam and Pangsit.
Mie Ayam
 Ingredients:
A. Chicken and mushrooms topping
1) 2 cloves Garlic
2) 1 chicken breast, diced
3) 5 white mushrooms
4) 1 tbsp. soy sauce
5) 1 tsp. oyster sauce
6) A dash of white pepper
7) ½ tsp. chicken essence powder
B. Noodle sauce
1) Juice from chicken mix topping
2) Fish sauce
Direction:
Sautee garlic until fragrant, add diced chicken and mushrooms and stir-fry for a few minutes. Add the sauces and pepper and essence powder and stir for a few more minutes until cooked. Marinate cooked noodles with noodle sauce and add the chicken and mushrooms topping and vegetables.
Mom’s Dumplings
 Ingredients:
1) Ground pork – marinade with a dash of cornstarch, sesame oil, soy sauce, fish sauce and white pepper (before mixing the other ingredients)
2) Ground (white) fish meat (optional)
3) Prawns or shrimps
4) Jicama/yam bean/bengkuang – peeled, cut and sliced
5) Dumpling wraps
Direction:
Mix marinated pork with ground fish and stir in one direction (the fish meat will cause the meat to be too chewy otherwise). Add jicama and prawns/shrimp to the meat mixture and stir lightly. Put a spoonful of meat mixture on each dumpling skin and wrap. Bring the dumplings to a boil twice, drain and serve.
Note: Don’t put too much cornstarch if using ground fish otherwise the mixture will be too sticky and chewy.
 I enjoyed a full week of mom’s cooking during my recent family reunion but too bad I didn’t take pictures of every single delicious dish that she prepared, but nonetheless, they were all enjoyable to the last bite. I managed to write down a few more recipes of my favorite dishes from mom though I will have to try cooking them myself before I post them here just to make sure they turn out ok.
 Muffin Express!
Better Homes and Gardens – New Baking Book: page 328 is where I find the recipe to make these blueberry muffins. It’s a simple recipe that calls for a quick mix and stir of flour, sugar, baking powder, eggs, milk, orange peel, an option of either melted butter or cooking oil (I used extra light olive oil) and fresh/frozen blueberries (used frozen, thawed blueberries), baked in a 350F oven for about 35 minutes (or until golden). It only took me about 10 minutes to prepare the dough and then 20 minutes to bake (using convection oven); it was muffin express! The delicious and fluffy muffin was such a nice treat to have with a cup of hot coffee on a rainy Sunday afternoon.

 Pasta Express
One thing I love about pasta is that it is very quick and easy to cook no matter how you cook it (as long as it’s al dente). I’m not a big fan of whole-wheat spiral pasta but since it was the only kind of pasta that I had in the kitchen the other day, I had to improvise a simple pasta dish from what I had available in the fridge. The strong texture and taste of whole-wheat pasta (thick ones, like the spiral pasta), in my opinion, can be easily masked with an equally strong flavor sauce such as blue cheese sauce. It only took me 15 minutes (quick by my standard) to prepare this dish, including boiling the pasta. This dish was quick, easy and satisfying.
Ingredients:
1) 2 Green Onions
2) Salt, black and white pepper, Mrs. Dash, paprika
3) Cayenne pepper (optional)
4) Blue Cheese
5) Pacific Northwest Smoked Salmon fillet
6) Olive Oil
7) Capers
8) 1 cube frozen dill or fresh dill
9) Whole Wheat Spiral Pasta
Direction:
Drain pasta and set aside. Heat oil on medium heat. Stir in green onions, salt, pepper, Mrs. Dash, paprika and cayenne pepper and sauté for a few seconds. Add the smoked salmon fillet, divide into chunks and sauté for a minute or until salmon is warm and then remove from the pan and set aside. Add olive oil to the same pan and put the pasta in. Add salt, pepper, Mrs. Dash, paprika and cayenne pepper to taste. Add the cubed dill and Blue Cheese and mix until most of the Blue Cheese melts (with a few small crumbs left behind). Turn off heat and add capers and mix. Add the mixture to the salmon and mix. Can be served warm or cold.
Steamed Eggs with Smoked Salmon
 My mom used to cook steamed eggs dish as a last resort - whenever the supplies of fresh ingredients had run out by the end of the week and she had not gone to the market to resupply. It’s basically scrambled eggs, mixed with a few drops of water, salt and white pepper and then steamed. I was just trying to be creative with this dish by adding chunks of smoked salmon fillet, green onions and red-hot chili pepper. But I think mine was a little bit dryer than the ones I used to have. It wasn’t bad though, but it wasn’t great either. I think it would’ve been better without the extra ingredients in it; it would’ve been better to stick with the tried and true, simple but original recipe.
Ingredients:
1) 3 eggs
2) Green Onions
3) Salt, black and white pepper, paprika
4) 2 small red hot chili peppers (optional)
5) Pacific Northwest Smoked Salmon fillet
6) 1 tbsp. water
Direction:
Beat eggs, green onions, peppers, salt and pepper in a bowl. Mix in chunks of smoked salmon and water. Put the bowl on a steamer stand inside a big enough pot with 2 cups of water. Cover and let the water boil and the egg is cooked.
 Multitasking Chicken Thighs
It has been raining a lot in this part of the world and the air has been cold and damp so I was planning to make a big pot of hot chicken soup with the package of 4 chicken thighs that I had in the fridge. But then I thought it would be such a waste to only cook soup with those meaty chicken thighs; surely you can make a hearty meal out of those chicken thighs in addition to the soup (as it turned out, they made four hearty meals for two people in two dinners). So with those four chicken thighs I managed to not only make a big pot of Chicken Leeks Clear Soup, but also a chicken dish that I’d like to call Chicken Thighs Braised with Caramelized Red Onions in Red Wine Reduction.
Chicken Leeks Clear Soup
 Ingredients:
1) 2 leeks – chopped
2) 4 chicken thighs
3) 2 cloves garlic – smashed
4) Thumb sized ginger – smashed
5) Salt, black and white pepper, Mrs. Dash
6) ½ tsp turmeric
Direction:
Put all ingredients except turmeric in a pot with water and boil on high heat. Once boiled for the first time (10-15 minutes), take chicken thighs out and set aside. Add ½ tsp turmeric and 1/4 cup of water and bring to another boil. Let simmer for another 10 minutes on medium low heat and then on low heat until serving time.
Chicken Thighs Braised with Caramelized Red Onions in Red Wine Reduction
 Ingredients:
1) 1 clove garlic – chopped
2) 1 shallot – sliced
3) 1 red onion – thinly sliced
4) Sea salt, black pepper, Mrs. Dash, paprika
5) ½ cup red wine
6) Canola or Olive oil
7) 4 chicken thighs from the soup
Direction:
Heat canola oil in a pan on medium high heat. Add sliced shallot and chopped garlic and sauté until fragrant. Add a dash of sea salt, black pepper, Mrs. Dash and paprika. Add red onion and sauté for one minute. Add ¼ cup of red wine and turn heat to medium low and let simmer for about 5-10 minutes or until the liquid has reduced by half. Add another ¼ cup of red wine and let simmer again for another 5-10 minutes or until the liquid has reduced by half. Put the chicken thighs from the leeks soup on top of the semi caramelized onions with the wine reduction and cover and let simmer on medium low heat for another 5 minutes. Add a pinch of sea salt, black pepper, Mrs. Dash and paprika on top of the chicken, turn chicken over once and then once more so the skin side is up. Cover the pan with aluminum foil and put the pan in the oven and let bake for 15-20 minutes (or until the meat is cooked and no longer red inside). Remove the aluminum foil and broil for 3 minutes. Take the pan out of the oven and let sit for a minute and serve with pasta.
Whole Wheat Pasta soaked in Olive Oil
Drain pasta once boiled. Add olive oil, salt, pepper, Mrs. Dash to taste and garnish with thyme. Serve with the Chicken Thighs Braised with Caramelized Red Onions in Red Wine Reduction.
 The chicken is tender and juicy and the red onion with red wine reduction sauce adds a rich and delectable flavor to the whole dish.
 Strawberry spectacular!
Génoise in Strawberry Champagne Sauce, page 242 in the “Spectacular Desserts” section of the “Better Homes and Gardens - New Baking Book”. The exact title is: Olive Oil Génoise in Strawberry Champagne Sauce.
I generally don’t make any dessert that contains the word “spectacular”, or any fancy foreign word (especially in French – which to me is like the couture of all cuisines) in its description. “Spectacular” sounds a little too intimidating to me - if a dessert is “spectacular”, it must be hard to make - and “génoise”?? Well, that just sounds too sophisticated and I didn’t even know what the word meant. And so for the past two years since I purchased this “Better Homes and Gardens - New Baking Book”, never once did I try any of the recipes in the “Spectacular Desserts” section, that is, until last week.
 Olive Oil Génoise in Strawberry Champagne Sauce is the first of the “Spectacular Desserts” recipes that I have ever tried. I chose this recipe because after reading the step-by-step instruction carefully, I realized how simple it actually was (especially if you own a KitchenAid Stand Mixer). In addition, I also liked the fact that it only contains 275 calories per serving, which is a fraction of what those other fancy desserts usually contain. How can I not love this “Better Homes and Gardens - New Baking Book”? Not only can I pick and choose any of the 600 plus recipes based on how easy the recipe is and how nice the picture looks in the book, but I can also pick and choose the recipe based on its nutritional value.
 The recipe for the génoise calls for 6 eggs, ¾ cup sugar, 1/3 cup extra-light olive oil (not extra-virgin olive oil), and 1¼ cups sifted all-purpose flour, and the mixture is to be baked in a 9-inch springform pan. However, since I didn’t want to use so many eggs, I only used 2/3 of each of the ingredients, starting with 4 eggs, etc. (hence, I’d like to speculate that I only consumed 2/3 of the given calories and fat per serving,) and I used a 6½-inch springform pan. To my relief, the génoise turned out well and those high school math classes really paid off. The génoise was nice and fluffy and the strawberry champagne sauce gave a complementary fruity-syrupy flavor to it. It was spectacular indeed!
P.s. After googling “génoise”, I now know what the word means.

 The Italian dish that never was...
I’m sure the Italians don’t serve them like these (pictured above), but when you’ve got prosciutto, capicolla, soppressata and a chunk of fresh mozzarella in the fridge and nothing else but an empty stomach, you do what you gotta do. In my case, I just quickly layered the prosciutto, capicolla, soppressata together with some mozzarella and sliced Swiss cheese (a slight deviation here), sliced tomatoes, diced green olives and slices of red onions on top of slices of cornbread (that’s been sitting on the kitchen counter for a few days), baked them for about 10 minutes in the oven and pronto! I just built myself a number of makeshift but delicious mini pizzas good enough to quiet down my growling stomach. The authentic Italian panini can be made some other day, when I am not starving.
Melted cheese is simply the best!

Turkey Leftover - Day 6 - Turkey soup for the soul
 No turkey left behind! My partner took the initiative to put the leftover turkey bones in a big pot of water and boil it into soup because I argued that those leftover bones would not make a good soup since they had been roasted/cooked before. To my delightful surprise, the soup was actually quite delicious and even heart warming. I love a nice hot bowl of clear and simple soup and this leftover turkey soup was definitely clear and simple in appearance but rich and complex in flavor. Never again will I underestimate those leftover turkey bones!
Ingredients:
1) Thanksgiving turkey leftover bones.
2) Water.
3) 2-3 carrots, peeled and cut.
4) Cilantro.
5) Salt, black and white pepper and Mrs. Dash.
Direction:
Place all ingredients in a big pot and bring to a boil. Lower heat and let simmer for a few more minutes. Serve warm in a bowl.
Turkey Leftover - Day 5 - Turkey pasta - Part II
 Another plate of pasta, with cheese on top.
Ingredients:
1) Whole wheat pasta, boiled and drained.
2) Leftover turkey, stuffing, gravy and vegetable broth.
3) Italian parsley, chopped.
4) 1 small shallot, diced.
5) Salt, pepper, Mrs. Dash and paprika to taste.
5) Grated cheese.
Direction:
Heat oil on medium heat. Sautee diced shallot until fragrant. Add leftover turkey and stuffing and stir fry for a few minutes. Add gravy and vegetable broth by the tablespoons and let simmer for a few more minutes. Add chopped Italian parsley and cooked pasta. Season with salt, pepper, Mrs. Dash and paprika. Remove from pan and serve warm. Garnish with grated cheese. Serve with fried egg on the side (optional).
Turkey Leftover - Day 4 - Turkey Sandwich
 It's good-a!
Ingredients:
1) Whole wheat bread.
2) A couple of slices of Smoked Gouda cheese.
3) Leftover turkey and stuffing
4) 1 tsp. of leftover turkey gravy (for extra flavor)
5) 1 tsp. of cranberry sauce.
6) Italian parsley.
7) 1/4 tsp. of butter to brush on the outside of the bread.
Direction:
Layer all ingredients on each side of the bread, sandwiched together. Brush butter on the outer side of each bread and grill. Serve warm.


